To provide the best experiences, we use technologies like cookies to store and/or access device information. Consenting to these technologies will allow us to process data such as browsing behavior or unique IDs on this site. Not consenting or withdrawing consent, may adversely affect certain features and functions.
The technical storage or access is strictly necessary for the legitimate purpose of enabling the use of a specific service explicitly requested by the subscriber or user, or for the sole purpose of carrying out the transmission of a communication over an electronic communications network.
The technical storage or access is necessary for the legitimate purpose of storing preferences that are not requested by the subscriber or user.
The technical storage or access that is used exclusively for statistical purposes.
The technical storage or access that is used exclusively for anonymous statistical purposes. Without a subpoena, voluntary compliance on the part of your Internet Service Provider, or additional records from a third party, information stored or retrieved for this purpose alone cannot usually be used to identify you.
The technical storage or access is required to create user profiles to send advertising, or to track the user on a website or across several websites for similar marketing purposes.


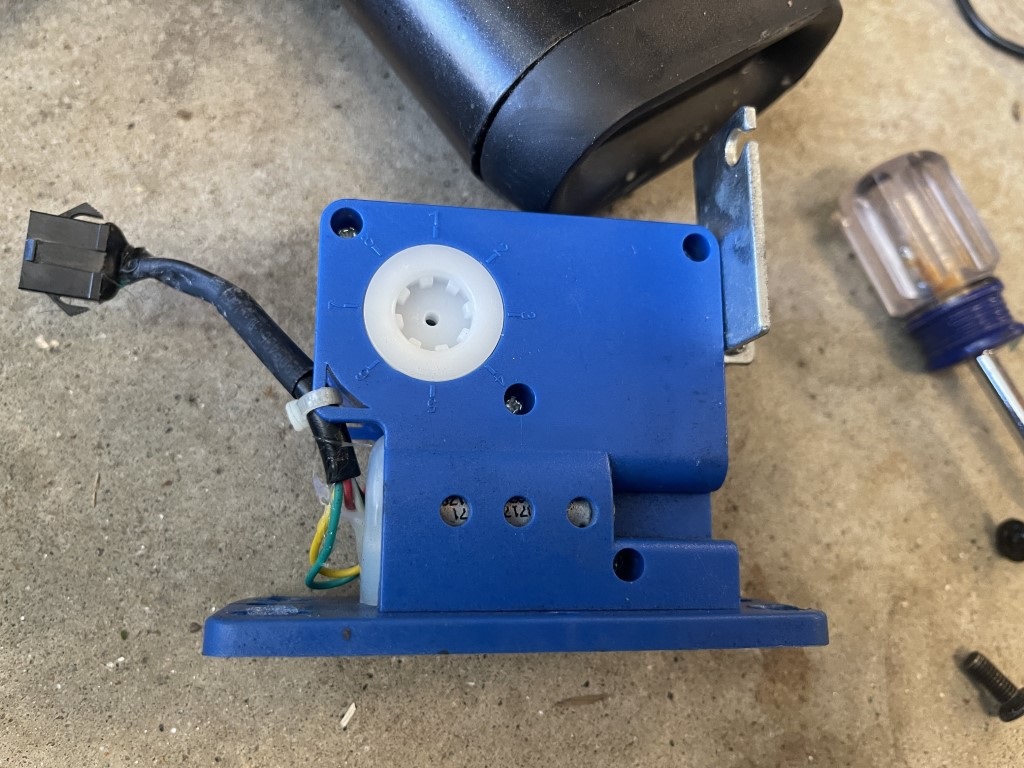
Hey I just got the new servo I bought from you installed, but the wires are rubbing the little rounds as they pass on the disc. Have you experienced this issue? just wondering how I can get the wires out of the way. I guess some hot glue might work. Those 4 bolts that secure the servo motor are the Baine to my existence, but I’m forced to pull it back off to tuck these wires out of the way.
I did use a zip tie to pull the big cable back a little from the disc. I didn’t have any trouble with the other wires but I bet a zip tie would work on them too. I fought with the bolts my first time installing also. It probably would have been easier if I had disassembled further but a long Philips with a magnet worked for me.
Yes, I saw you used a magnet on your screwdriver and that has been helping… I cleared the wires out of the way with some hot glue and of course my luck yielded another issue.
Now my resistance on the machine won’t calibrate to where I am setting it with the disc. I’ve tried adjusting the tensioner several times over and when I attempt to change resistance on the machine it is wonky, I.e. if I started it at max resistance and aligned where the magnets should be on the disk and then attempt to turn the resistance down it goes 20, 1, 18, 20, 19 etc. The same happens vice versa when trying to line up the tensioner at the 0 resistance or 1 to start and then turn it up it will go 1, 20, 18, 19…Any pointers on calibrating?
I had some issues having to adjust the cable but it sounds like your out of position with the “moon” piece. If you set it at resistance 1 with the spring on the bottom disconnected and then manually reconnect it you should be able to see where it is and adjust as necessary. I would move the moon piece first and then adjust the cable.
Another thought would be to make sure with the spring disconnected that the motor increments properly from 1-20.
I’ve identified the issue after I took the servo motor I purchased off. Since the Yellow, blue, and green wires were loose, and I didn’t catch this untill after the part was replaced, the magnets on the spinning disc caught one of the wires and pulled it out of the harness therefore no longer allowing continuity across all of the circuits.
It would be wise to resolve this issue for any further motors sold and/or for buyers to be sure to hot glue them out of the way of those spinning magnets on the disc.
any advice on reconnecting this yellow wire that was pulled out by the bowflex upon testing? I might be able to resolve the issue myself, but don’t have any electrical connection pieces this small.
Yikes – So the wheel in the back caught the wire and ripped it off of the pot on the servo motor. It really should be soldered back on. If you can’t do that just return it. Once USPS receives I can send you a replacement. That stinks. I just went and looked at my unit and was surprised at how close that wheel actually is to the motor. I thought it was further away. These will definitely have to be glued down in the future.
I appreciate, that. I ended up using my glue gun to secure the wire back to the solder point. So far it’s working. I’ll test the machine further working out over the next week or so and see if it holds up. If that doesn’t hold up, I should have a friend or two that solders that can help me with the loose wire.
Awesome – sounds good. I will make a point to glue those wires down in the future.
Can I send in my broken unit for repair?
I don’t have a system setup for that, but that’s a great idea. I would prefer to keep things out of landfills. I need to look into how I could do that on Ebay.